

How To Clean Adf On Hp Officejet 4620
Z7_3054ICK0KGTE30AQO5O3KA30N0
hp-concentra-wrapper-portlet
![]() Actions
Actions
An ADF Paper Jam Error Displays on the HP Officejet 4610 All-in-One, Officejet 4620, Deskjet Ink Advantage 4610, and 4620 e-All-in-One Printer Series
Issue
When you use the automatic document feeder (ADF) to copy, scan, or fax, the error message 'The original has jammed or the document feeder (ADF) is dirty. To remove the original, open the ADF cover. To clean the ADF, see the user guide' displays on the product control panel.
Experiencing frequent or recurring paper jams?
-
Before loading paper in the ADF tray, hold the stack of paper, and then tap the bottom edge on a flat surface so that the stack is even on all sides.
-
Push the stack of paper forward until the message 'Original Loaded' displays on the control panel, and then adjust the paper width guides so they rest against the stack of paper. Do not push the guides in so tightly that they bind against the paper.
caution:
Do not force the paper to move too far forward in the tray.
-
Do not overload the ADF tray with paper.
-
Do not use paper that is bent, torn, dusty, damp, wrinkled, curled, or paper that does not lie flat.
-
Use only one type of paper at a time. Do not mix different types, weights, or sizes of paper.
-
Do not use paper that is too thin, too thick, or too glossy for the product.
-
To help prevent ADF jams, make sure that the parts of the ADF are clean and free of dust or sticky material. This applies to the input and output trays, ADF scanner glass strip, separator pad, and pickup rollers.
Causes
-
The paper is loaded incorrectly in the ADF tray.
-
The paper rollers are damaged or dirty.
-
The ADF tray contains torn, wrinkled, or damp paper.
-
The ADF tray contains more than one type of paper.
-
The paper is jammed inside the HP product where you cannot see it.
-
An obstruction is blocking the paper path.
-
Torn pieces of paper from a previous jam are stuck in the product.
-
The tray is too full.
Solution one: Clear the paper jam
Follow these steps in the order presented to clear a paper jam from the ADF.
Step one: Remove the jammed paper
Follow these steps to remove jammed paper from inside the ADF.
-
Remove any loose paper from the ADF input tray and output trays.
caution:
Do not remove jammed paper at this stage.
Figure : Remove any loose paper from the ADF trays

-
Lift the ADF cover.
Figure : Lift the ADF cover

-
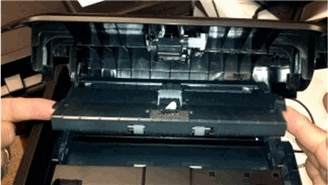
Find the tabs on the sides of the ADF mechanism, and then gently lift up on the tabs to raise the ADF mechanism.
Figure : Raise the ADF mechanism
-
Gently pull the paper out of the ADF mechanism.
caution:
If the paper tears when you are removing it from the ADF mechanism, check the rollers and wheels for torn pieces of paper that might remain inside the product. If you do not remove all the pieces of paper from the product, more paper jams are likely to occur.
-
Lower the ADF mechanism.
-
Lower the cover of the ADF, and then press down firmly until it snaps into place.
Step two: Make a copy using the ADF
Follow these steps to make a copy using the ADF.
-
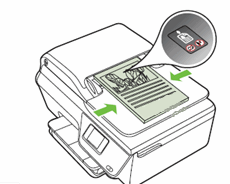
Grasp the main input tray on each side, and then pull it out until it stops.
-
If necessary, slide the paper width guides out as far as possible.
-
Load unused, plain white paper in the main input tray, and then adjust the paper width guides in until they rest against the paper.
Figure : Load the paper into the main input tray

-
Push the input tray back into the product.
-
Load a one-page original of undamaged paper print side up in the ADF input tray.
-
Push the original forward until the message 'Original Loaded' displays on the control panel.
-
Slide the paper width guides in until they stop at the edge of the paper. Do not push the guides in so tightly that they bind against the paper.
Figure : Adjust the paper width guides
-
Press the button (
 ) next to Copy.
 -
Press the button next to Copies.
-
The Copies screen displays with (+) and (-) options. Press the button next to OK to print a single copy.
- Press the button next to Black Copy or Color Copy.
-
If these steps resolved the issue, you do not need to continue troubleshooting.
-
If the issue persists, continue to the next solution.
Solution two: Clean the ADF and scanner glass strip
To help prevent ADF jams, make sure that the parts of the ADF are clean and free of dust or sticky material. This applies to the input and output trays, the separator pad, the ADF scanner glass strip, and the pick rollers.
Step one: Clean the rollers in the ADF
Follow these steps to clean and inspect the rollers in the ADF.
-
Gather the following items.
-
A clean, lint-free cloth
-
Several clean cotton swabs
-
Bottled or distilled water
-
-
Press the Power button (
 ) to turn off the product.
 -
Disconnect the power cord from the rear of the product, if it is not already disconnected.
-
Disconnect the USB cable from the rear of the product, if it is not already disconnected.
-
Lift the ADF cover, and then find the separator pad.
Figure : Lift the ADF cover
Figure : The separator pad
-
Lightly dampen a clean, lint-free cloth with bottled or distilled water, and then squeeze any excess liquid from the cloth.
-
Gently wipe the separator pad. Apply a moderate amount of pressure to remove any dust or dirt buildup.
-
Locate the tabs on the sides of the ADF mechanism, and then gently lift up on the tabs to raise the ADF mechanism.
-
Lightly dampen a clean, lint-free cloth with bottled or distilled water, and then squeeze any excess liquid from the cloth.
-
Clean the ADF rollers. Press the cloth against the rollers, and then rotate the rollers upward with your fingers. Apply a moderate amount of pressure to remove any dust or dirt buildup.
Figure : Clean the ADF rollers
-
Lightly dampen a clean cotton swab with bottled or distilled water, and then squeeze any excess liquid from the cotton swab.
-
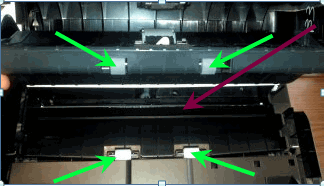
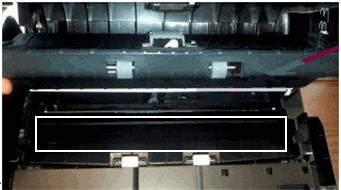
Find the rollers behind the ADF mechanism.
Figure : Find the rollers behind the ADF mechanism
-
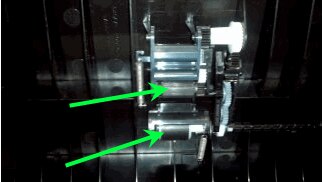
Clean the rollers behind the ADF mechanism. Press the cotton swab against the rollers, and then rotate the rollers upward with your fingers. Apply a moderate amount of pressure to remove any dust or dirt buildup.
Figure : Clean the rollers behind the ADF mechanism

-
Allow the rollers to dry completely.
-
Lightly dampen a clean, lint-free cloth with bottled or distilled water, and then squeeze any excess liquid from the cloth.
-
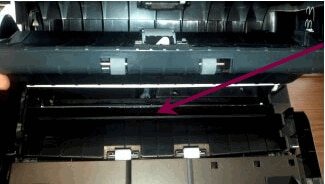
Gently wipe the lint-free cloth along the scanner glass strip behind the ADF mechanism to clean it.
Figure : The scanner glass strip behind the ADF mechanism
-
Allow the scanner glass strip to dry completely.
-
Gently close the ADF mechanism.
-
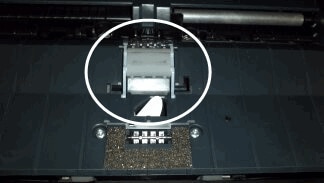
Find the pick rollers underneath of the ADF cover.
Figure : The pick rollers under the ADF cover
-
Lightly dampen a clean, lint-free cloth with bottled or distilled water, and then squeeze any excess liquid from the cloth.
-
Press the cloth against the pick rollers, and then rotate the rollers upward with your fingers. Apply a moderate amount of pressure to remove any dust or dirt buildup.
-
Allow the rollers to dry completely.
-
Lower the cover of the ADF, and then press down firmly until it snaps into place.
-
Reconnect the power cord to the rear of the product.
-
Press the Power button (
) to turn on the product.
Step two: Make a copy using the ADF
Make another copy using the ADF.
How to make a copy using the ADF
-
Grasp the main input tray on each side, and then pull it outward until it stops.
-
If necessary, slide the paper width guides out as far as possible.
-
Load unused, plain white paper in the main input tray, and then adjust the paper width guides in until they rest against the paper.
Figure : Load the paper into the main input tray
-
Push the input tray back into the product.
-
Load a one-page original of undamaged paper print side up in the ADF input tray.
-
Push the original forward until the message 'Original Loaded' displays on the control panel.
-
Slide the paper width guides in until they stop at the edge of the paper. Do not push the guides in so tightly that they bind against the paper.
Figure : Adjust the paper width guides
-
Press the button (
) next to Copy. -
Press the button next to Copies.
-
The Copies screen displays with (+) and (-) options. Press the button next to OK to print a single copy.
- Press the button next to Black Copy or Color Copy.
-
If these steps resolved the issue, you do not need to continue troubleshooting.
-
If the issue persists, continue to the next solution.
Solution three: Reset the product
Follow these steps to reset the product.
Step one: Perform a power reset
Follow these steps to perform a power reset.
-
With the printer turned on, disconnect the power cord from the rear of the printer.
-
Unplug the power cord from the wall outlet.
-
Wait at least 15 seconds.
-
Plug the power cord back into the wall outlet.
-
Reconnect the power cord to the printer.
-
Turn the printer on.
Step two: Make a copy using the ADF
Make another copy using the ADF.
How to make a copy using the ADF
-
Grasp the main input tray on each side, and then pull it out until it stops.
-
If necessary, slide the paper width guides out as far as possible.
-
Load unused, plain white paper in the main input tray, and then adjust the paper width guides inward until they rest against the paper.
Figure : Load the paper into the main input tray
-
Push the input tray back into the product.
-
Load a one-page original of undamaged paper print side up in the ADF input tray.
-
Push the original forward until the message 'Original Loaded' displays on the control panel.
-
Slide the paper width guides in until they stop at the edge of the paper. Do not push the guides in so tightly that they bind against the paper.
Figure : Adjust the paper width guides
-
Press the button (
) next to Copy. -
Press the button next to Copies.
-
The Copies screen displays with (+) and (-) options. Press the button next to OK to print a single copy.
- Press the button next to Black Copy or Color Copy.
-
If these steps resolved the issue, you do not need to continue troubleshooting.
-
If the issue persists, continue to the next solution.
Solution four: Service the product
Service or replace your HP product if the issue persists after completing all the preceding steps.
Go to Contact HP Customer Support to schedule a product repair or replacement. If you are in Asia Pacific, you will be directed to a local service center in your area.
To confirm your warranty status, go to HP Product Warranty Check. Repair fees might apply for out-of-warranty products.
How To Clean Adf On Hp Officejet 4620
Source: https://support.hp.com/id-en/document/c03162170
Posted by: irvinyouserainvid.blogspot.com
0 Response to "How To Clean Adf On Hp Officejet 4620"
Post a Comment